SMED: Single-Minute Exchange of Die (Reduce Changeover Time)
Turn this article into takeaways for your work.
Each assistant summarizes the article only for you and suggests best practices for your work.
SMED (single-minute exchange of die) is the lean method for slashing equipment changeover time to under ten minutes. It's one of the most powerful tools in manufacturing and operations, because it turns long setup stops from an accepted cost of doing business into a solvable engineering problem.
What is SMED?
SMED stands for single-minute exchange of die. It's a systematic approach to reducing the time it takes to switch a machine or process from producing one product to another. The word "die" refers to the metal stamping tools (dies) used in automotive and press manufacturing, but the method applies to any equipment setup: injection molding, food packaging lines, pharmaceutical equipment, even hospital operating room turnovers.
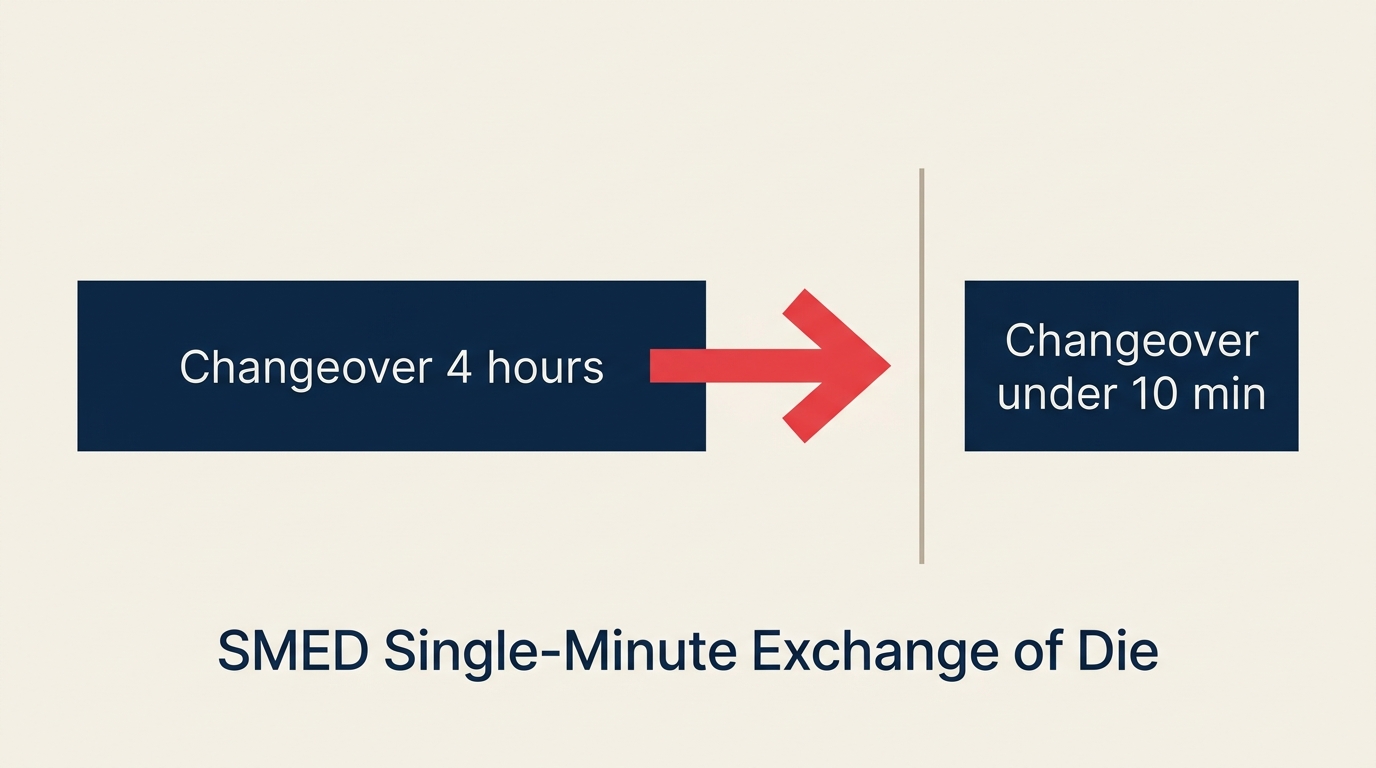
The goal isn't literally one minute. "Single-minute" means the changeover time should fit in a single digit of minutes, that is, under 10 minutes. A setup that once took 4 hours becomes 8 or 9 minutes.
Shigeo Shingo, a Japanese industrial engineer consulting at Toyota, developed SMED between the 1950s and 1970s after observing that equipment idle time during changeovers was one of the biggest hidden drains on capacity. His work was published in his 1985 book A Revolution in Manufacturing: The SMED System and has since become a core tool in lean methodology worldwide.
Key facts
- Shigeo Shingo developed SMED at Toyota and other Japanese manufacturers from the late 1950s through the 1970s, formalizing the methodology by 1969 when he cut a large press changeover at Toyota from 4 hours to 3 minutes.
- "Single-minute" does not mean 1 minute. It means a single digit of minutes, any time under 10 minutes qualifies.
- Companies that apply SMED report typical changeover reductions of 40-75%, with some extreme cases exceeding 90% reduction.
Internal vs external setup
The foundation of SMED is a simple distinction that most operations ignore: some setup work has to happen with the machine stopped, and some can happen while the machine is still running.

| Setup type | Definition | Example |
|---|---|---|
| Internal setup | Work that requires the machine to be stopped | Removing a die, tightening bolts, adjusting tooling inside the machine |
| External setup | Work that can be done while the machine runs | Pre-staging tools, pre-heating dies, gathering documents and materials, pre-positioning the next job's fixtures |
Before SMED, most operations treat all setup work as internal, they stop the machine, then figure out what they need. Shingo's insight was that a huge portion of that work could be moved outside the stoppage window, slashing the actual downtime dramatically.
The SMED steps
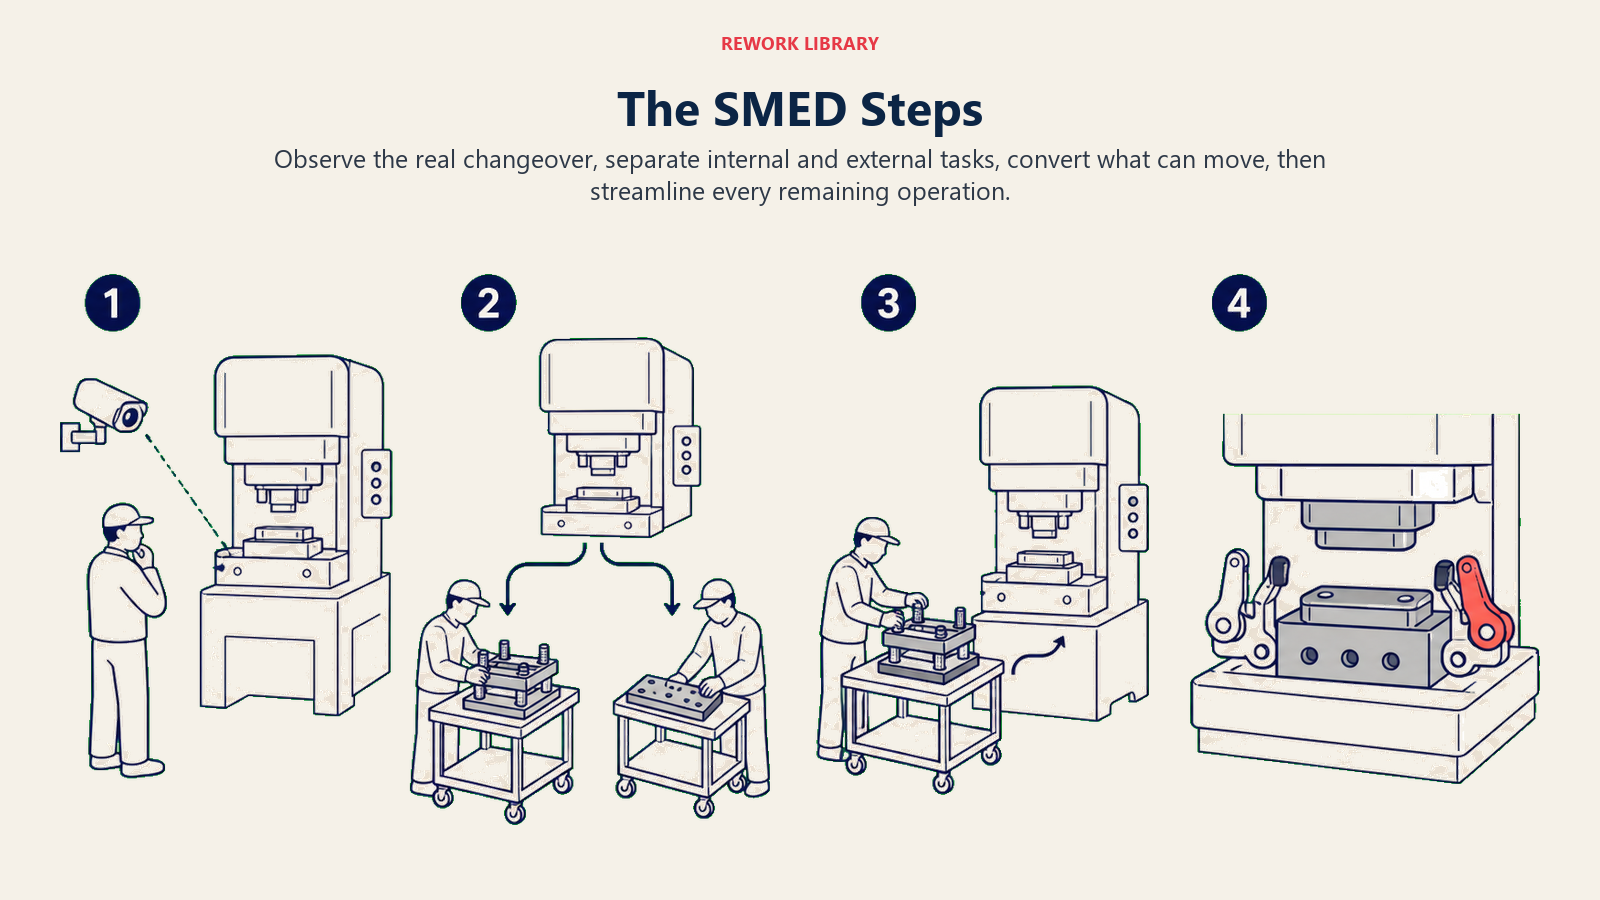
Shingo's framework breaks down into three core moves. Think of them as sequential: first you see clearly, then you separate, then you optimize.
| Step | What you do | Why it matters |
|---|---|---|
| 1. Observe and record | Film and time the entire current changeover from start to finish | You can't improve what you haven't measured; video reveals delays invisible to memory |
| 2. Separate internal from external | Classify every task: can it be done while the machine runs? | This single step typically cuts 30-50% of changeover time before any other change |
| 3. Convert internal to external | Move as many internal tasks as possible to external | Pre-staging, pre-assembly, parallel prep by a second operator |
| 4. Streamline all operations | Simplify every remaining internal task (standardized bolts, quick-release clamps, one-touch fasteners) | Eliminates adjustment time and searching for tools |
| 5. Standardize and sustain | Write the new procedure, train operators, build checklists | Locks in the gain and stops drift back to old habits |
Converting internal to external is where the biggest wins live. Bolt patterns get replaced with quarter-turn clamps. Dies get pre-staged on carts at the press side. Adjustment steps get eliminated by building precision into fixtures so there's nothing left to adjust.
How to apply SMED
Step 1: Observe and time the current changeover
Start by filming a real changeover from beginning to end, including all the walking, searching, waiting, and adjusting that happens in practice, not in theory. Split the footage into individual tasks and note the time for each. This baseline is your benchmark and your evidence.
Step 2: Classify every task as internal or external
Go through your task list and mark each one: can this be done while the machine is producing? Be honest. Many tasks feel like they need the machine stopped but don't actually require it.
Step 3: Move external tasks out of the stoppage window
Redesign the workflow so all external tasks happen before the machine stops or after it restarts. Assign a prep person to stage everything the changeover needs, tools, materials, documentation, pre-heated components, before the run ends.
Step 4: Streamline internal tasks
For everything that genuinely requires the machine to stop, look at every source of delay: searching for tools, making adjustments, waiting for approvals. Replace multi-bolt fasteners with quarter-turn clamps or magnetic locks. Eliminate adjustments by building precision into fixtures. Use color-coded or dedicated tool stations so nothing has to be hunted down.
Step 5: Standardize the new method
Write a clear, visual standard operating procedure for the improved changeover. Use photos or short video clips, not just text. Train every operator. Time subsequent changeovers and track them on a visible board. Celebrate the wins; investigate any time that creeps back up.
SMED example
Consider an injection molding line that changes molds between product runs. Here's what the changeover looked like before and after a SMED project:
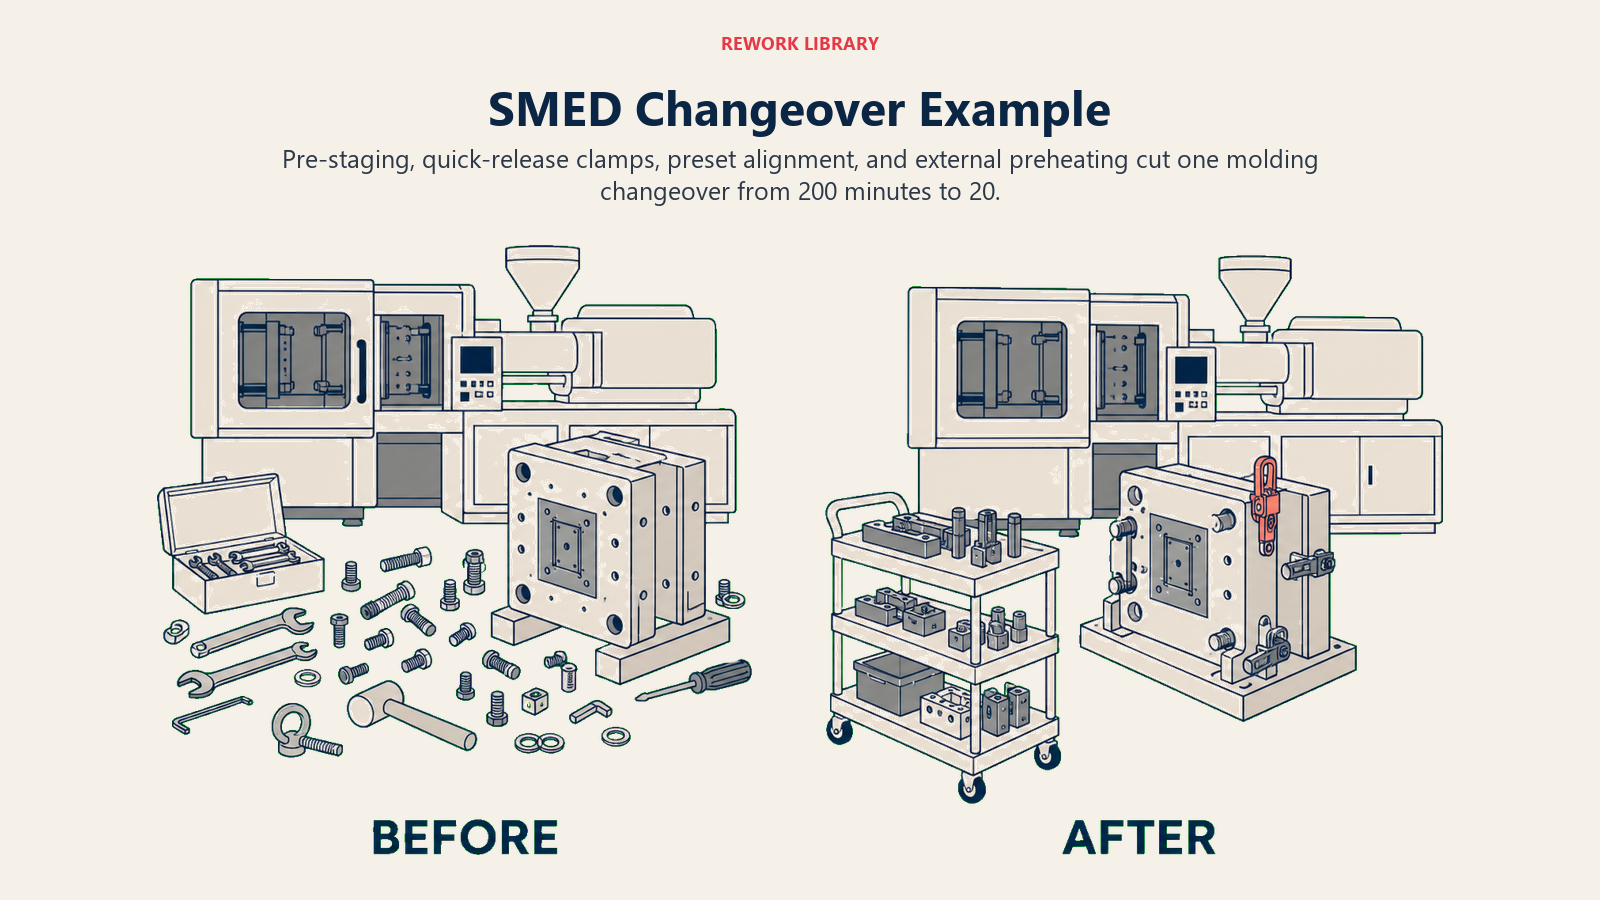
| Task | Before SMED | After SMED |
|---|---|---|
| Gather tools and fixtures | 25 min (done after machine stops) | 0 min (pre-staged during last 10 min of previous run) |
| Remove old mold | 35 min (multiple bolts) | 8 min (quick-release clamps) |
| Mount new mold | 40 min (multiple bolts, alignment adjustments) | 7 min (pre-set alignment fixtures, clamps) |
| Heat new mold to operating temp | 60 min (heated after mounting) | 0 min (mold pre-heated externally before changeover starts) |
| First-piece inspection and adjustment | 40 min | 5 min (reduced adjustment by precision fixtures) |
| Total changeover time | 200 min (3 hr 20 min) | 20 min |
That's a 90% reduction. The machine now runs 3 additional hours per shift. And because changeovers are shorter, smaller batch sizes become economically viable, which directly feeds just-in-time production and heijunka scheduling.
Why SMED matters
Changeover time is a multiplier. Every hour saved on setup is an hour that can produce parts. But the benefits go further than raw capacity.
OEE availability. Overall equipment effectiveness breaks down into availability, performance, and quality. Changeover time is one of the biggest drains on the availability score. Cut setup time in half and availability jumps significantly.
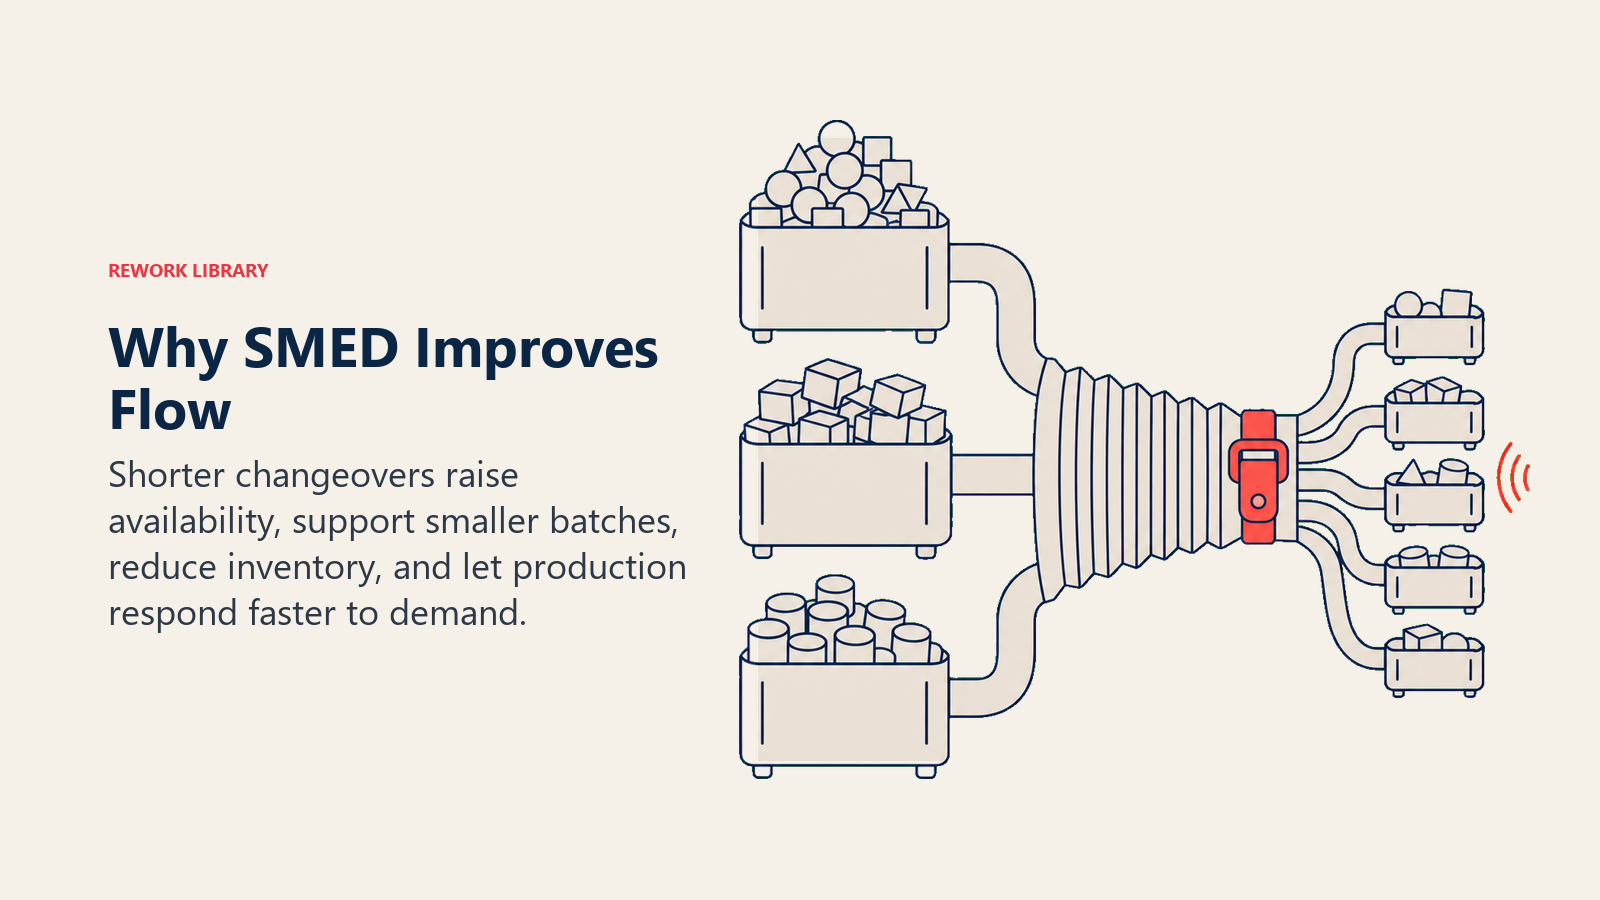
Smaller, flexible batches. Long changeovers push operators toward large batch sizes to amortize the setup cost. A 4-hour changeover makes a 2-day production run feel efficient. But large batches create large inventory, long lead times, and poor responsiveness to customer demand. When changeovers drop to under 10 minutes, small batches become practical, which is exactly what value stream mapping typically reveals as the path to flow.
Just-in-time compatibility. Just-in-time production requires the ability to switch between product variants frequently without large setup penalties. SMED is often the prerequisite that makes JIT achievable.
Equipment reliability linkage. Fast, standardized changeovers reduce fumbling and improvisation, which also reduces the risk of setup-related equipment damage. This connects directly to total productive maintenance, a clean, well-documented changeover is easier to maintain and audit.
Benefits and limitations
Benefits
- Dramatic reduction in non-productive machine time
- Enables smaller batch sizes and shorter production runs
- Reduces work-in-progress inventory
- Improves production flexibility and response to demand changes
- Builds operator skill and process ownership through standardization
Limitations
- Requires upfront investment in tooling changes (quick-release clamps, precision fixtures, dedicated carts)
- Capital investment can be significant for complex equipment
- Gains need active management or they erode over time; operators drift back to old habits without visual standards and regular auditing
- SMED is most impactful on high-frequency changeover operations; on equipment that changes rarely, the return on investment is lower
- SMED addresses setup time only, it doesn't improve the performance rate or quality rate components of OEE directly

Senior Operations & Growth Strategist
On this page
- What is SMED?
- Key facts
- Internal vs external setup
- The SMED steps
- How to apply SMED
- Step 1: Observe and time the current changeover
- Step 2: Classify every task as internal or external
- Step 3: Move external tasks out of the stoppage window
- Step 4: Streamline internal tasks
- Step 5: Standardize the new method
- SMED example
- Why SMED matters
- Benefits and limitations