More in
Data Migration Guide
Exporting Cleanly from Salesforce: The Migration-Ready Export Guide
Apr 18, 2026
Exporting Cleanly from HubSpot: What the Native Export Misses
Apr 18, 2026
Exporting Cleanly from Pipedrive: Deals, Contacts, and Activity History
Apr 18, 2026
Escaping Spreadsheets: The 5-Step Migration to a Real CRM
Apr 18, 2026
Handling Historical Activities, Notes, and Emails During CRM Migration
Apr 18, 2026
Post-Migration Data Audit: What to Verify and When
Apr 18, 2026
User Access During CRM Migration: The Least-Privilege Approach
Apr 18, 2026
Communicating the CRM Migration to Your Sales Team
Apr 18, 2026
Rollback Planning for CRM Migrations: Hope You Don't Need It
Apr 18, 2026
Long-Term Archiving of Legacy CRM Data: What to Keep and How
Apr 18, 2026
Testing the Migration With a Shadow Import
Turn this article into takeaways for your work.
Each assistant summarizes the article only for you and suggests best practices for your work.
A shadow import is the difference between "we found 3 mapping errors in the sandbox" and "we found 3 mapping errors on cutover day with 30 reps waiting." Gartner's research on IT project risk consistently shows that testing phases are the most frequently compressed part of migration projects — and the compression is the main cause of rollbacks. It takes 2–3 hours to run properly. It prevents the kind of problems that delay go-live by a week.
One migration team skipped the shadow import because they'd already tested in a spreadsheet. They verified the field mapping looked correct in Excel, confirmed the picklist values lined up, and felt confident. On cutover day, they discovered that the relationship fields between Contacts and Deals didn't resolve — the import tool handled association lookups differently from what the spreadsheet comparison had suggested. Every deal in the system was orphaned from its contacts. The cutover was postponed for five days while they resolved the associations manually. This kind of relationship failure is harder to spot if you haven't mapped out the CRM data model design of the destination before running your test. And it's almost always preventable when the field mapping document is complete before the test run begins.
A shadow import in an actual sandbox would have caught that in the first 10 minutes.
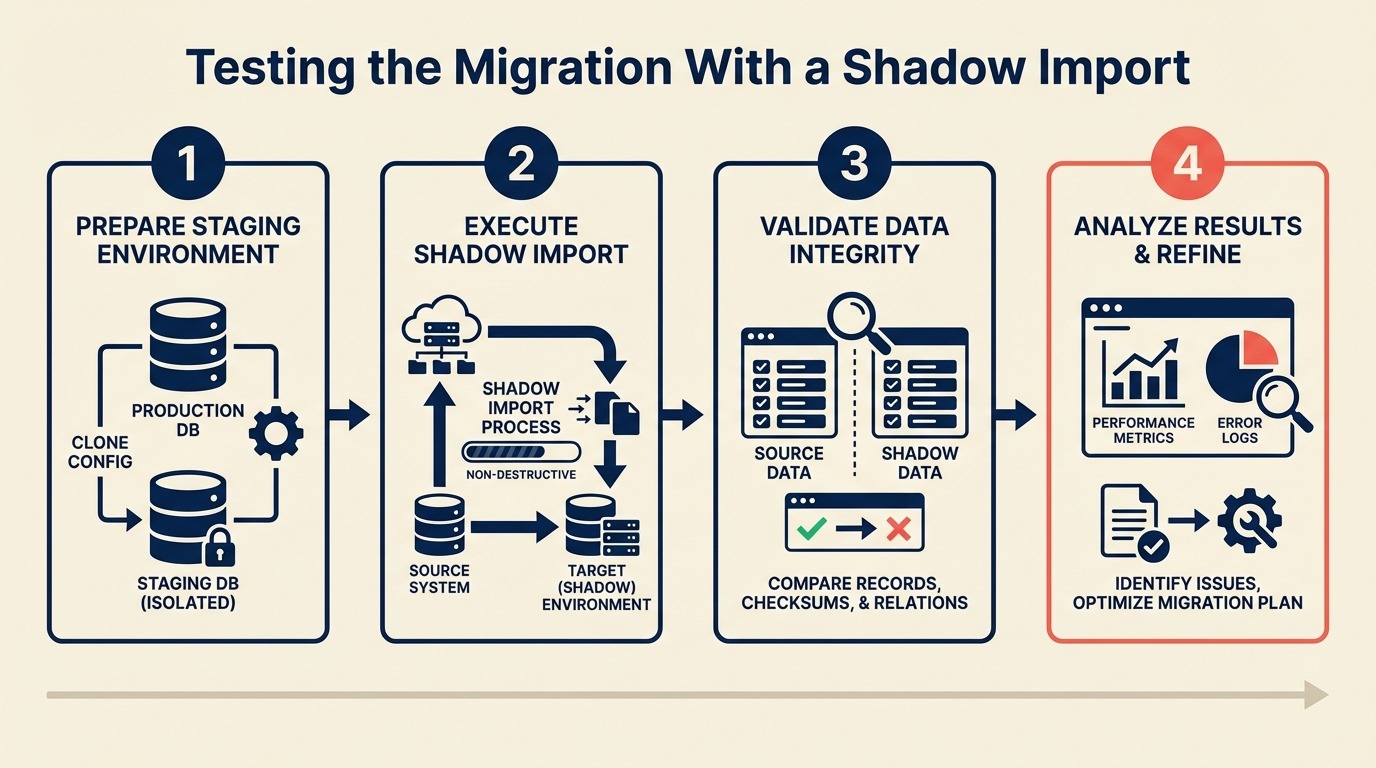
This guide walks you through the complete shadow import process: setup, test dataset selection, the import run itself, QA verification, and the sign-off criteria that clear you for cutover.
Step 1: Set Up a Sandbox or Test Environment
You need a real instance of the destination CRM — not a spreadsheet comparison, not a side-by-side visual check. The goal is to run your actual import tooling against an actual CRM environment and see what happens.
HubSpot: HubSpot's sandbox accounts are available on Professional and Enterprise tiers. Go to Settings > Account Management > Sandboxes. Create a sandbox, then configure the same custom properties, pipeline stages, and lifecycle stage definitions that exist in your production account. The sandbox should mirror production setup — otherwise you're testing against different configuration than what you'll use on cutover day. The HubSpot sandbox documentation covers what syncs automatically from production and what you have to configure manually.
Salesforce: Salesforce has multiple sandbox types. For migration testing, a Developer sandbox is sufficient — it has the same configuration (objects, fields, picklist values) as production. Full sandboxes include production data but are slower to provision and usually unnecessary for migration testing. Setup > Environments > Sandboxes > New Sandbox.
Pipedrive: Pipedrive doesn't have a native sandbox. Create a free trial account under a different email address. Configure it to match your production pipeline stages and custom fields. The free tier limits are fine for testing with 500–1,000 records.
Zoho CRM: Zoho has a sandbox environment available under Setup > Developer Space > Sandbox. Configuration mirrors your production instance.
When a sandbox isn't available:
- Create a new production account with a test company name and a dedicated admin email
- Use a clearly labeled import tag ("TEST IMPORT - DELETE") on all test records
- After testing, delete all records with that tag before cutover
The sandbox must have:
- All custom fields created and configured (same type, same picklist values as production) — the custom fields guide covers which fields to create and how to name them consistently
- Pipeline stages and lifecycle stages defined to match your destination configuration
- User accounts set up if you're testing user-assignment fields
- Integration webhooks disabled — you don't want test imports triggering real notifications
Step 2: Prepare a Representative Test Dataset
The test dataset is where most shadow imports fall short. Teams use 50 clean, well-formatted records and conclude the migration works. Then the full dataset includes 40 records with accented characters, 200 with null relationship fields, and 15 with notes containing HTML tags — and the full import breaks in ways the test didn't predict.
Target size: 500–1,000 records. This is large enough to expose edge cases but small enough to QA manually. The ETL testing principles described in the Wikipedia ETL article recommend that test datasets include representative samples of every data quality pattern, not just clean records — the same logic applies here. If you haven't run the data cleaning and deduplication step yet, do that before building your test dataset — clean data exposes mapping errors more clearly than dirty data does.
Test Dataset Selection Criteria
Build your dataset by deliberately including problem records, not just clean ones:
| Category | Record count | What to test |
|---|---|---|
| Clean, fully-populated records | 150 | Baseline — all fields present, standard formatting |
| Missing phone number | 60 | Null handling in phone field |
| Missing email | 40 | How nulls in required fields are handled |
| Unusual characters in name fields | 50 | O'Brien, Müller, José, Li Wei, double-barrel names |
| Maximum field length | 30 | 255-character company names, long notes, max-length URLs |
| Duplicate candidates (2 contacts, same email) | 20 | How the import tool handles duplicates |
| Contacts with no company association | 30 | Standalone contacts without Account/Company links |
| Contacts associated with multiple deals | 30 | Multi-association relationship records |
| Records with HTML in notes or description fields | 20 | Note field rendering in destination |
| Records with the oldest dates in the dataset | 20 | Date field formatting edge cases |
| Records from every lifecycle stage value | 1 per value | Picklist mapping coverage |
| Records from every lead source value | 1 per value | Picklist mapping coverage |
| Total | ~500 |
Export this set specifically — don't just take the first 500 rows. The first 500 rows are usually the most recently created records, which are typically cleaner than older records. You want the mess in your test dataset.
Step 3: Run the Import With Your Exact Tooling
This is critical: use the same import tool, the same field mapping file, and the same transformation rules you'll use on cutover day. If you use a different method for the test import, you're testing a different process.
Common import tools by source/destination combination:
- HubSpot → Other CRM: Native CSV export + destination CRM's CSV import, or a migration tool like HubSpot's native import wizard for flat objects. HubSpot's import documentation details the column header format required for each object — your test CSV must follow this exactly or the import will skip rows silently.
- Salesforce → Other CRM: Salesforce Data Loader (free, Salesforce's own tool) for CSV exports, or a purpose-built migration tool. Data Loader's batch mode is essential for test runs — it produces a per-row success/error log that makes QA much faster.
- Pipedrive → Other CRM: Native CSV export + destination import wizard
- Any → Any: Third-party migration tools like Trujay, Migrate.io, or Import2 handle relationship resolution automatically
Before you run: Load your field mapping document and transformation rules. You should be following the document, not improvising. If you're making decisions on the fly during the test import, the document isn't finished — go back and complete it before the actual run. If you're switching from HubSpot, switching from HubSpot to Rework covers the import sequence quirks specific to that source system.
Import order (this matters):
- Companies / Accounts first
- Contacts second (so company associations can resolve)
- Deals / Opportunities third (contact associations must exist)
- Activities last (deal and contact associations must exist)
Run the import in this order even for the test. Deviating from the order is one of the most common causes of broken relationship fields.
Watch the import log in real time. Don't walk away and come back. The log will show field validation errors, type conversion failures, and records that were skipped. Note every error with the record ID and the error message — you'll need this list for the QA step.
Step 4: Post-Import QA Checklist
After the import completes, don't assume it worked because it finished without errors. Run through this checklist systematically.
Post-Import QA Checklist
Record count verification:
- Total contacts imported matches expected count (baseline minus any intentional skips)
- Total companies imported matches expected count
- Total deals imported matches expected count
- Import error count matches the error log (no silent skips)
Field type correctness:
- Date fields display as dates (not text strings, not Unix timestamps)
- Number fields (Annual Revenue, deal amount) display as numbers, not text
- Currency fields format correctly in the destination
- Phone fields display in a consistent format
- Checkbox fields are True/False (not "1"/"0" or "Yes"/"No" unless that's the target)
Picklist value mapping:
- All lifecycle stage values map to valid destination values (no blank lifecycle stages)
- Lead source values map correctly
- Deal stage values map correctly
- Any custom picklist fields map correctly
Relationship integrity:
- Open 20 contact records and verify the company association is correct
- Open 10 deal records and verify the contact association is correct
- Verify that at least 3 deal records have the correct deal owner assigned
- For any multi-association records (contacts linked to multiple deals), verify all associations present
Formula and calculated field results:
- If the destination CRM calculates fields (days since last activity, deal age, etc.), spot-check 5 records for plausible values
Automation trigger check:
- Verify that test import records did not trigger live workflows/sequences (important if you ran in a production-adjacent environment)
Log every failure. A QA check that "mostly works" is not a pass — every failure is a defect in your field mapping document that will affect the full import.
Step 5: Test the Three Most-Used Reports
Field-level verification catches individual record errors. Report verification catches systemic mapping problems that only appear when data is aggregated.
Identify your three most-used reports:
- Usually: pipeline overview by stage, contacts by lifecycle stage, and deals created this month
- Ask your sales team which reports they open daily — those are the ones to verify. The weekly pipeline review article describes which pipeline report formats sales teams rely on most — useful context for deciding which reports matter most to test.
For each report:
- Run the same report against the source system on your 500-record test sample
- Run the same report (filtered to imported records) in the destination
- Compare the numbers
Counts should match. If your source system shows 85 SQL contacts in the test sample and the destination shows 79, you have a lifecycle stage mapping error affecting 6 records. Find them before the full import.
Common report-level mismatches and their causes:
- Count difference in a lifecycle stage: Picklist value that didn't map correctly
- Revenue totals off: Currency field imported as text (not summing correctly)
- Date-based filters returning wrong records: Date format imported incorrectly; records are attributed to the wrong period
- Empty owner reports: User assignment didn't resolve
Step 6: Have a Sales Rep Test Five Records End-to-End
Technical QA finds technical errors. Sales reps find usability errors — the fields that look correct in the import log but feel wrong when you're trying to work a deal.
Pick a rep who knows the source data well. Give them the record IDs of five contacts and ask them to:
- Find the record in the new system
- Verify the information looks right — company, title, phone, email, lifecycle stage
- Check the activity history for those contacts
- Open any associated deals and verify deal information
- Report anything that looks wrong or missing
Don't give them a QA checklist. Their unguided reaction to the data quality is more valuable than a structured check. The feedback you want is "this looks right" or "where's the deal stage I was using?" — that's the signal that tells you whether the migration will cause problems for the team on day one.
Step 7: Document Every Error and Fix It Before Cutover
After QA, you'll have a list of errors. Each error has one of two causes:
- A mistake in the field mapping document
- An edge case in the data that the mapping document didn't account for
Both need to be fixed in the mapping document before cutover. Don't fix errors by manually editing records in the destination — that patches 3 records and leaves the root cause in place for the remaining 47,000.
For each error:
- Identify the root cause: wrong transformation rule, wrong type handling, wrong picklist mapping
- Update the mapping document
- Re-run the affected test records through the corrected process
- Verify the output is correct
If fixing an error requires re-running the full test import, do it. Yes, it takes another 2–3 hours. But discovering on cutover day that your fix introduced a secondary error is worse.
Keep a log of all errors found and how they were fixed. This log becomes part of your migration documentation and is useful if a post-cutover issue surfaces that wasn't caught in testing. MIT Sloan's research on data governance emphasizes that error documentation during testing phases is what separates organizations that learn from migrations from those that repeat the same mistakes on the next one.
Sign-Off Checklist Before Scheduling Cutover
Don't schedule cutover until every item on this list is complete:
Data verification:
- Record count in test import matches expected count within 0.5%
- Zero unresolved field type errors in the import log
- Lifecycle stage null rate < 1% of imported records
- All relationship fields resolve correctly (no orphaned contacts or deals)
Report verification:
- All three key reports match source system counts within 2%
- Revenue/currency totals match source within 0.1%
- Date-based filters return correct record sets
Stakeholder sign-off:
- Sales rep QA completed — at least one rep has tested 5+ records and confirmed data looks correct
- Sales leadership has seen the key reports and confirmed they look right
- IT/admin has verified user access and permission setup
Process readiness:
- Field mapping document finalized (all errors from test import corrected)
- Import sequence documented
- Rollback plan documented
- Cutover communication drafted
Do not schedule cutover until every checkbox is checked. The sign-off list isn't bureaucracy — it's the checkpoint that separates "we think it will work" from "we've verified it works." Once it's checked, move directly to the cutover day checklist to plan the go-live window.
Common Pitfalls
Testing with too few records to expose edge cases. A 50-record test with all clean data will pass QA and still fail on the full import when it hits the 200 records with HTML in the notes field. Use 500+ records with deliberate edge cases.
Not testing relationships — just flat contact fields. Contact field QA is the easy part. Relationship QA is where migrations break. Every deal-to-contact association, every contact-to-company link needs to be tested explicitly, not inferred from field-level checks.
Skipping the sales rep QA step. Technical users check whether fields are correct. Reps check whether the data is usable. Those are different standards. A phone number that's technically valid but in an unusable format (no area code, wrong country code) passes technical QA and fails the rep test.
Fixing errors in the destination instead of in the mapping document. This is the most common mistake. You find 5 records where the lifecycle stage is blank, manually set them to "SQL" in the destination, and move on. On cutover day, 500 records import with blank lifecycle stages. Fix the root cause in the mapping document.
Scheduling cutover before the shadow import is complete. Pressure from leadership to hit a specific go-live date is real. But scheduling cutover before sign-off criteria are met is how migrations fail publicly, with sales leadership watching. A one-week delay on the shadow import beats a cutover rollback. Pipeline hygiene culture is relevant context here — teams with weak pipeline discipline often underestimate how much bad data surfaces during shadow testing.
What to Do Next
Schedule the shadow import at least 5 business days before your planned cutover. That buffer gives you time to fix errors, re-run the test import if needed, and get stakeholder sign-off without rushing. And once you've signed off, CRM rollout and adoption has the rep training and change management steps that turn a clean data migration into a system the team actually uses.
The shadow import should be the last activity before cutover scheduling — not one of several parallel tasks happening simultaneously. Give it the attention it requires.
Once the sign-off checklist is complete, you're ready to schedule cutover and prepare the day-of playbook. That process is covered in the cutover day guide.
Related Resources

Co-Founder, Rework.com
On this page
- Step 1: Set Up a Sandbox or Test Environment
- Step 2: Prepare a Representative Test Dataset
- Test Dataset Selection Criteria
- Step 3: Run the Import With Your Exact Tooling
- Step 4: Post-Import QA Checklist
- Post-Import QA Checklist
- Step 5: Test the Three Most-Used Reports
- Step 6: Have a Sales Rep Test Five Records End-to-End
- Step 7: Document Every Error and Fix It Before Cutover
- Sign-Off Checklist Before Scheduling Cutover
- Common Pitfalls
- What to Do Next
- Related Resources