More in
Data Migration Guide
Exporting Cleanly from Salesforce: The Migration-Ready Export Guide
Apr 18, 2026
Exporting Cleanly from HubSpot: What the Native Export Misses
Apr 18, 2026
Exporting Cleanly from Pipedrive: Deals, Contacts, and Activity History
Apr 18, 2026
Escaping Spreadsheets: The 5-Step Migration to a Real CRM
Apr 18, 2026
Handling Historical Activities, Notes, and Emails During CRM Migration
Apr 18, 2026
Post-Migration Data Audit: What to Verify and When
Apr 18, 2026
User Access During CRM Migration: The Least-Privilege Approach
Apr 18, 2026
Communicating the CRM Migration to Your Sales Team
Apr 18, 2026
Rollback Planning for CRM Migrations: Hope You Don't Need It
Apr 18, 2026
Long-Term Archiving of Legacy CRM Data: What to Keep and How
Apr 18, 2026
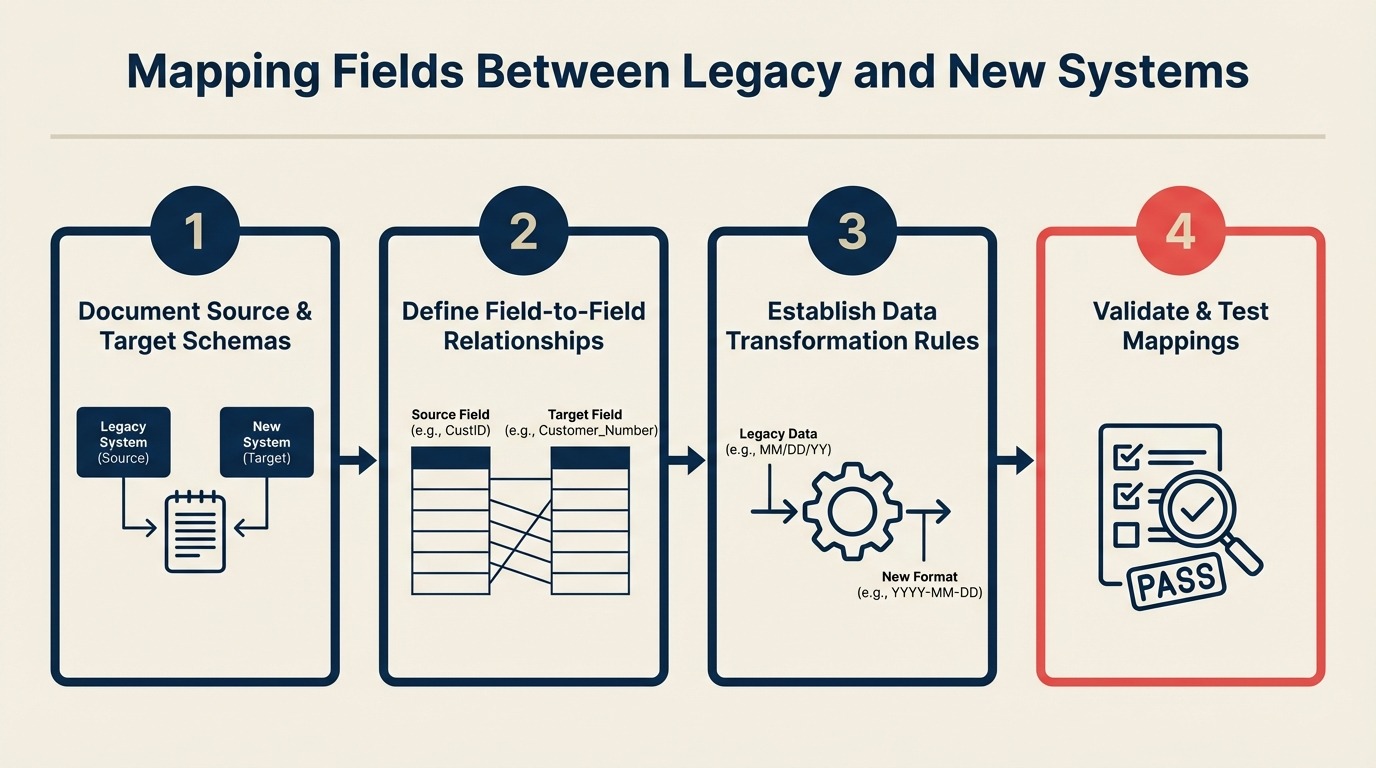
Mapping Fields Between Legacy and New Systems
Turn this article into takeaways for your work.
Each assistant summarizes the article only for you and suggests best practices for your work.
Field mapping is a core step in any ETL (Extract, Transform, Load) process — and in CRM migrations specifically, it's the part that looks simple until it isn't. "First Name maps to First Name" — sure. But what happens when your source system has a single Full Name field and your destination requires First Name and Last Name separately? Or when Lead Status in Salesforce has 8 values and the destination supports 5? Or when Annual Revenue imports as a text field instead of a currency field, breaking every revenue report on day one?
That last scenario isn't hypothetical. It happens all the time. And it's preventable — if you build the field mapping document before the first import run, not during it.
This guide walks through the complete field mapping process: object-level mapping first, then standard fields, then the hard cases (custom fields, picklist values, relationship fields, type mismatches). Work through these steps in order before you touch the destination CRM. If you haven't run the upstream steps yet, start with preparing your data before migration and data cleaning and deduplication first.
Step 1: Object-Level Mapping First
Before you map a single field, map the objects. Every CRM uses slightly different terminology for the same concepts, and misaligned object mapping corrupts relationship data at scale.
Standard Object Mapping
| Source system | Source object | Destination concept | Notes |
|---|---|---|---|
| Salesforce | Lead | Contact (pre-conversion) | Salesforce Leads convert to Contact + Account + Opportunity |
| Salesforce | Contact | Contact | Direct map |
| Salesforce | Account | Company | |
| Salesforce | Opportunity | Deal | |
| Salesforce | Activity (Task/Event) | Activity | |
| HubSpot | Contact | Contact | Direct map |
| HubSpot | Company | Company | Direct map |
| HubSpot | Deal | Deal | Direct map |
| HubSpot | Ticket | Ticket / Support Case | Depends on destination |
| Pipedrive | Person | Contact | |
| Pipedrive | Organization | Company | |
| Pipedrive | Deal | Deal | Direct map |
| Pipedrive | Activity | Activity | |
| Zoho CRM | Lead | Contact (pre-conversion) | Similar to Salesforce Lead model |
| Zoho CRM | Contact | Contact | |
| Zoho CRM | Account | Company |
The Salesforce Lead conversion problem: Salesforce has both Leads and Contacts. Leads are pre-conversion; Contacts are post-conversion. Most other CRMs have only Contacts (with lifecycle stages). Before you map anything, decide: are you migrating Salesforce Leads as Contacts with a "Lead" lifecycle stage, or are you only migrating converted Contacts? This decision affects thousands of records. Switching from Salesforce to Rework explains how this Lead-to-Contact conversion plays out specifically in the Rework data model. And if deduplication of those leads hasn't happened yet, data cleaning and deduplication should run before you finalize the object map.
When the object model doesn't match: If your source has a custom object with no equivalent in the destination, document it explicitly. Don't force-fit custom object data into a standard object — it creates confusion. Either migrate it as a custom object in the destination, or decide it's not worth migrating at all.
Step 2: Standard Field Mapping
Standard fields seem straightforward. They often aren't.
First Name / Last Name vs. Full Name: Salesforce stores first and last name separately. Some systems store a single "Full Name" field. If migrating to a system that requires separate first/last names from a source that has only Full Name, you'll need a split transformation — and it's imperfect (what do you do with "Dr. María José García-López"?).
Phone field multiplicity: Salesforce Contacts have Phone, MobilePhone, OtherPhone, HomePhone, AssistantPhone — five separate phone fields. Most CRMs have one primary and one secondary phone field. Decide before import which source fields map to which destination fields. Don't discard phone numbers without documenting that decision.
Email multiplicity: Same problem. Salesforce has Email and a secondary email via Contact methods. HubSpot supports multiple emails per contact. If the destination supports only one primary email, you need a rule for which one wins.
Website field: Inconsistent URL formats cause validation errors. Some records have "example.com", some have "https://www.example.com", some have "www.example.com/products/page". Decide on a target format and add it as a transformation rule.
Step 3: Custom Field Inventory
This is where most migrations get bogged down. Every mature CRM has dozens of custom fields accumulated over years of changing processes. Most of them aren't worth migrating.
Export all custom fields from your source:
- Salesforce: Setup > Object Manager > Select object > Fields & Relationships. Export as a list. The Salesforce Data Loader documentation covers how Data Loader exports field schema alongside record data — useful for building the inventory alongside your export.
- HubSpot: Settings > Properties. Filter by "Created by" = your team to see custom properties. The HubSpot import documentation lists which properties are required on import — cross-reference this when deciding which destination fields to create first.
- Pipedrive: Settings > Data Fields. Custom fields are listed per object.
- Zoho CRM: Setup > Customization > Fields.
For each custom field, apply the three-question test. The custom fields guide goes deeper on naming conventions, field type choices, and the governance process for custom field creation in the destination — worth reading before you start building fields in production:
- Do you report on it? If there's no report that uses this field, it's likely not providing business value.
- Do you segment by it? If no workflow, sequence, or list filter references this field, it may be dormant.
- Do you automate from it? If no automation trigger uses this field, consider whether it needs to migrate.
If the answer to all three is no, archive it in the source system. Don't create the field in the destination.
Document the keep/skip decision for every custom field. When a sales rep asks in week three why their "Partner Type" field is gone, you want a written record of why that decision was made — not a shrug.
Custom Field Inventory Template
| Field name | Object | Type | Reports using it | Segmentation use | Automation use | Decision | Notes |
|---|---|---|---|---|---|---|---|
| Partner Type | Contact | Picklist | Yes (1 report) | Yes (1 list) | No | Migrate | Used in partner reporting |
| Legacy Territory | Account | Text | No | No | No | Archive | Replaced by new territory model |
| MQL Score (manual) | Contact | Number | No | No | No | Skip | Replaced by automated scoring |
| Referral Source Detail | Contact | Text | Yes (2 reports) | No | No | Migrate |
Step 4: Picklist Value Transformation
Picklist fields are the highest-risk field type in any migration. They look simple but hide complexity — source values often don't match destination values, and unmatched values either import blank or throw an error.
The process:
- Export all distinct values for each picklist field from the source
- Export all allowed values for the matching field in the destination
- Build an explicit value-to-value mapping
- Decide what to do with source values that have no destination equivalent
Picklist Mapping Template
Example: Lead Status / Lifecycle Stage
| Source value | Count | Destination value | Handling |
|---|---|---|---|
| New | 1,450 | Lead | Direct map |
| Working | 680 | Lead | Map to Lead |
| Nurturing | 320 | Lead | Map to Lead |
| Marketing Qualified | 290 | MQL | Direct map |
| Sales Accepted | 175 | SQL | Direct map |
| Sales Qualified | 210 | SQL | Combine with above |
| Demo Scheduled | 88 | SQL | Map to SQL + add activity note |
| Proposal Sent | 62 | SQL | Map to SQL |
| Customer | 2,400 | Customer | Direct map |
| At Risk | 155 | Customer | Map to Customer, add tag "at-risk" |
| Churned | 310 | Customer | Map to Customer (inactive) |
| Dead | 890 | Disqualified | Map to Disqualified |
| Not Interested | 430 | Disqualified | Map to Disqualified |
What to do with values that have no destination equivalent: Don't leave them blank. Either map them to the closest destination value (with a note in the transformation document) or create a custom field in the destination to preserve the distinction. Blank values in lifecycle stage mean those records won't be picked up by automations that filter on lifecycle stage.
Step 5: Relationship Field Mapping
Relationships are the part of field mapping that breaks most often and is hardest to fix after the fact.
Account → Contact associations (Salesforce): Every Contact in Salesforce is linked to an Account via the AccountId lookup. In most destination CRMs, this becomes a Contact → Company association. The import tool needs to resolve that relationship — typically by matching Company name from the Contact record to an existing Company record.
The order of operations matters: Import Companies first, then Contacts. If you import Contacts before Companies exist in the destination, the relationship can't be established.
Deal → Contact associations: A Deal in Salesforce (Opportunity) has a Primary Contact and may have additional contacts via the Opportunity Contact Role. Check whether your destination CRM supports multiple contact associations per deal, and decide which contacts to migrate.
Multi-relationship records: Some contacts are associated with multiple companies (consultants, board members). Most CRMs handle this differently from Salesforce. Document how these will import and test a handful of these records specifically in your shadow import.
Parent-child account hierarchies: Salesforce Accounts can have parent Accounts (for subsidiary relationships). Not all destination CRMs support this natively. Know before you map whether parent-child hierarchies will survive the migration.
Step 6: Field Type Mismatches
Field type mismatches are the most dangerous mapping problem because they often import without an error — the wrong type just silently corrupts the data. Gartner's research on master data management identifies field type inconsistency as one of the leading causes of data integrity failures in system migrations.
Type Conversion Reference Table
| Source type | Destination type | Safe? | Transformation needed |
|---|---|---|---|
| Text | Text | Yes | None |
| Text | Picklist | Risky | Values must match picklist; unmapped values fail |
| Picklist | Text | Yes | Values import as-is |
| Number | Text | Yes | None |
| Text | Number | Risky | Any non-numeric character causes import error |
| Currency | Number | Risky | Strip currency symbol and comma separators |
| Number | Currency | Yes | None |
| Date | DateTime | Yes | Append T00:00:00Z |
| DateTime | Date | Yes | Strip time component |
| Text (date-formatted) | Date | Risky | Must convert to ISO 8601 first |
| Checkbox (Boolean) | Text | Yes | True/False as strings |
| Text | Checkbox | Risky | Must standardize to True/False exactly |
| Lookup (ID) | Association | Risky | Requires resolution logic — most import tools don't handle this automatically |
The Annual Revenue problem: This comes up constantly. According to the Wikipedia overview of data migration, currency and numeric field type mismatches are among the most frequently cited causes of migration data loss. Salesforce stores Annual Revenue as a currency field. Some destination CRMs store it as a plain Number. If you import a formatted currency string like "$1,250,000.00" into a Number field, the import will error. Strip the dollar sign and commas before import: transform $1,250,000.00 to 1250000. For a broader look at how CRM data models differ across platforms — including field type handling — Rework vs. HubSpot CRM is a useful reference before you finalize the type conversion rules.
Checkbox fields: Different systems represent boolean values differently. Salesforce exports True/False. Some CRMs import 1/0. Some require "Yes"/"No". Know what your import tool expects and transform accordingly.
Step 7: The Transformation Rules Document
For every field that isn't a direct map, write down the transformation rule explicitly. This document becomes your import guide — the person running the import follows it without needing to make decisions on the fly.
Transformation Notation
Use a consistent format for all transformation rules:
IF [source_field] = "[source_value]"
THEN [destination_field] = "[destination_value]"
ELSE [default_behavior]
Examples:
IF lead_status = "Dead" OR "Not Interested"
THEN lifecycle_stage = "Disqualified"

IF annual_revenue = text format "$N,NNN,NNN.NN"
THEN annual_revenue = REPLACE("$","") + REPLACE(",","") [numeric only]

IF phone = any format
THEN phone = E.164 format (+CC + subscriber number, no separators)

IF close_date = NULL
THEN close_date = [leave blank, do not default to any date]

IF contact.account_id IS NOT NULL
THEN [resolve AccountId → Company via company_name match in destination]
ELSE [create standalone contact with no company association]
Write a rule for every non-trivial mapping. If you can't write the rule, you haven't made the decision yet — and that's exactly the problem you're trying to avoid.
Step 8: Validate the Field Map With 100 Test Records
Before you run the full import, validate every mapping decision against your 100-record test sample.
Run the test import using your exact tooling. Don't test with a different import method than what you'll use on cutover day. The goal is to surface errors in your mapping document, not in your import tool.
Check every mapped field in the output:
- Do text fields have the right values?
- Do picklist fields show destination values (not source values)?
- Do date fields display in the correct format?
- Do currency/number fields import as numbers, not text?
- Do relationship fields resolve to the correct company/deal records?
Look for silent errors: An import run that completes with no errors is not the same as an import run that's correct. Open 10 records manually and compare them field-by-field against the source. Automated QA misses the silent type conversion errors that look clean in the import log.
If you find errors in the test import, fix the mapping document first. Don't fix records manually in the destination — that patches the symptom and leaves the root cause in your mapping file, where it will cause the same error for the next 10,000 records.
Common Pitfalls
Mapping custom fields without deciding if they're still needed. The custom field inventory step exists for a reason. Migrating a field no one uses adds noise to the destination CRM and confuses reps who see fields they don't recognize.
Ignoring field type mismatches. "It'll probably be fine" is how Annual Revenue becomes a text field that breaks your revenue dashboards on day one. Check every type mismatch explicitly.
Not documenting transformation rules and then forgetting them. You'll spend 90 minutes working out the lifecycle stage value mapping. Three weeks later, when someone asks why Leads are showing as "Unknown" in a report, you'll want that document. Write it down while it's fresh. For the lifecycle stage definitions to anchor this mapping work, lead lifecycle stages covers the standard progression and where most teams diverge from it.
Treating lookup/association fields the same as regular fields. Relationship fields require the associated record to already exist in the destination. If you import Contacts before Companies, all Company associations fail silently. Import order is part of the field mapping decision. The shadow import testing guide shows how to verify relationship resolution before cutover.
Testing with clean records only. Your test sample must include edge cases: records with null values, records with maximum field length, records with unusual characters. A mapping that works on clean data will fail on real data if you skip the messy cases. The shadow import testing guide specifies exactly how to build a representative test dataset with the right mix of edge cases.
What to Do Next
Export the source object schemas this week. Most CRMs have a way to download a field list with type information:
- Salesforce: Schema Builder (visual) or
describe()calls via Salesforce Workbench — Workbench gives you a full field list with API names and types in one export - HubSpot: Settings > Properties > Export
- Pipedrive: Settings > Data Fields
- Zoho: Setup > Customization > Fields. Zoho's CRM migration resources document the full object schema if you need a reference for field types
Create a spreadsheet with every source field and start filling in the destination field column. At this stage, even a rough first pass is valuable — you'll discover the hard cases (the picklist mismatches, the type conflicts, the fields with no destination equivalent) and can start making decisions before they become cutover-day crises. Once field mapping is complete and tested, CRM rollout and adoption covers how to prepare the team for day one — because a clean import doesn't guarantee smooth adoption.
Related Resources

Co-Founder, Rework.com
On this page
- Step 1: Object-Level Mapping First
- Standard Object Mapping
- Step 2: Standard Field Mapping
- Step 3: Custom Field Inventory
- Custom Field Inventory Template
- Step 4: Picklist Value Transformation
- Picklist Mapping Template
- Step 5: Relationship Field Mapping
- Step 6: Field Type Mismatches
- Type Conversion Reference Table
- Step 7: The Transformation Rules Document
- Transformation Notation
- Step 8: Validate the Field Map With 100 Test Records
- Common Pitfalls
- What to Do Next
- Related Resources