More in
Chat Funnel Setup
WhatsApp Business API Integration With Your CRM (Working Setup)
Apr 18, 2026
Click-to-WhatsApp Ad Campaigns: From Setup to First Conversion
Apr 18, 2026
Conversational Qualification: Questions That Don't Annoy Buyers
Apr 18, 2026
Designing a Chat Funnel for High-Ticket B2B (Not E-Commerce)
Apr 18, 2026
Configuring Fallback Flows When AI Agents Fail
Apr 18, 2026
Building a 24/7 Chat Funnel Without Burning Out Your Team
Apr 18, 2026
Chat Funnel A/B Testing: What to Test and How
Apr 18, 2026
GDPR-Compliant Chat Funnels for EU Buyers
Apr 18, 2026
Measuring Chat Funnel Performance: The Metrics That Matter
Apr 9, 2026
Lead Routing Automation for Chat-Captured Leads
Apr 7, 2026
Setting Up a Meta Ads → WhatsApp Chat Funnel End-to-End
Turn this article into takeaways for your work.
Each assistant summarizes the article only for you and suggests best practices for your work.
A demand gen manager at a mid-market SaaS company ran the same campaign twice. First to a landing page. Then to WhatsApp. Same audience, same creative, same $50/day budget. The landing page version generated 14 form fills in 7 days. The WhatsApp version generated 61 conversations. CPL was nearly identical. Conversation quality was not. Statista reports over 2 billion active WhatsApp users globally, making it the largest messaging platform by reach and giving Click-to-WhatsApp campaigns access to an audience no other ad format can match in many markets.
That gap is real, and it's why Click-to-WhatsApp campaigns have pulled serious budget away from traditional form-based funnels across Southeast Asia, LATAM, and increasingly in Europe. McKinsey's analysis of digital B2B sales trends found that buyers in high-growth markets now prefer interactive digital channels over static forms at every stage of the funnel. The death of the contact form as the primary lead capture mechanism is playing out in real campaign data. But the setup has 7 places where it breaks silently, and most of those breaks happen before a single lead ever replies.
This guide walks through every step of building a Meta ads-to-WhatsApp funnel: from Business Manager configuration to your first automated qualification flow. If you've been burned by a 3-day debugging session on a broken webhook, this is for you.
Prerequisites: What you need before you touch Ads Manager
Skipping this step is the single most common reason the funnel doesn't work on launch day.
Required before you start:
- Meta Business Manager account: verified, not just created. Business verification can take 2-5 business days. Don't start campaign setup until it's done.
- Facebook Page: connected to your Business Manager. The Page must be published (not in draft mode).
- WhatsApp Business API access: this is not the same as the WhatsApp Business app. You need API access, either through Meta's direct Cloud API (free, available in most regions) or through a Business Solution Provider (BSP) like 360dialog, Twilio, or Vonage.
- A dedicated phone number: not a personal number currently used on WhatsApp. The number gets consumed by the API and can't be used on any other WhatsApp installation.
- A messaging platform account: ManyChat, Respond.io, or equivalent. This is where your flows live.
- At least one approved WhatsApp message template: templates require Meta review, which takes 24-72 hours. You cannot send the first outbound message without an approved template.
If you're missing item 3 or 6, stop here and get those sorted first. The rest of the setup takes about 4 hours. Waiting for WhatsApp API access or template approval can take 3 days. Meta's Cloud API setup documentation walks through the full provisioning steps for self-managed API access.
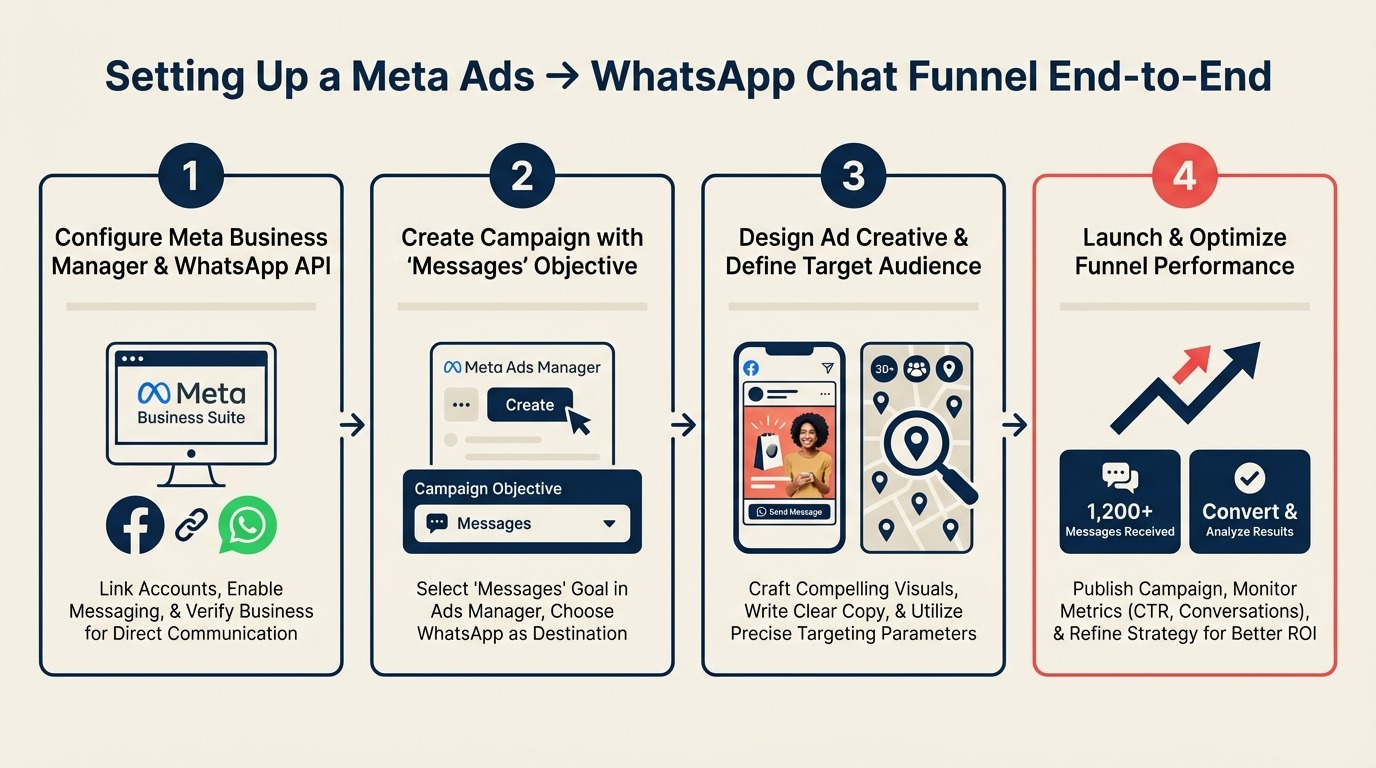
Step 1: Create the Click-to-WhatsApp campaign in Meta Ads Manager
In Ads Manager, create a new campaign. At the campaign objective selection screen, choose Engagement (not Leads; the Leads objective uses Lead Ads forms, which is a different funnel type). In some accounts you'll see a dedicated Messages objective; use that if it's available.
At the ad set level:
- Under Messaging apps, select WhatsApp
- Connect the Facebook Page that's linked to your WhatsApp Business number
- Set your audience, placements, and budget as normal
At the ad level:
- Choose your ad format (single image, video, or carousel all work)
- Under Message template, this is the pre-filled opening message the user sees when they tap the ad. It auto-populates in their WhatsApp compose window. Keep it short: "Hi, I'm interested in [your product/service]. Can you tell me more?" works well.
The user taps your ad, sees the pre-filled message in their WhatsApp, hits send, and your automation triggers. That's the entry point.
One important note: the campaign destination must be your WhatsApp Business API number, not your personal WhatsApp Business app number. If you connect the wrong number, ads will appear to run but no conversations will flow through to ManyChat or Respond.io.
Step 2: Set up your WhatsApp Business API number
If you're using Meta's Cloud API directly:
- In Business Manager, go to WhatsApp Accounts under Business Settings
- Add a new phone number
- Complete the verification (you'll receive a call or SMS)
- The number is now a WhatsApp Business API number
If you're using a BSP like 360dialog:
- Create an account with the BSP
- Go through their onboarding flow, which provisions a WhatsApp Business API number on your behalf
- The BSP gives you an API key you'll use to connect to ManyChat or Respond.io
To connect to ManyChat:
- In ManyChat, go to Settings → Channels → WhatsApp
- Enter your WhatsApp Business Account ID and phone number ID (both found in Meta Business Manager under WhatsApp Accounts)
- If using a BSP, enter the API key they provided
To connect to Respond.io:
- In Respond.io, go to Settings → Channels → Add Channel → WhatsApp Business API
- Choose Cloud API or BSP provider
- Follow the OAuth flow for Cloud API, or enter BSP credentials manually
After connecting, send a test message to the number from a personal WhatsApp. The message should appear in ManyChat or Respond.io within a few seconds. If it doesn't appear after 60 seconds, the connection is broken. Check that the phone number ID in your platform settings matches exactly what's in Meta Business Manager.
Step 3: Build the qualification flow in ManyChat
Your first flow should have exactly 4 messages. Not 8. Not 10. Every additional message after the fourth drops completion rate by roughly 10%.
A working B2B qualification sequence:
Message 1 (Welcome + Question 1): "Hi [First Name]! Thanks for reaching out. Quick question to make sure we connect you with the right team: how many people are on your sales team?" Buttons: Under 10 / 10-50 / 50+
Message 2 (Question 2): "Got it! And what's your biggest challenge right now with managing leads?" Buttons: Speed of response / Lead quality / CRM hygiene / Something else
Message 3 (Question 3, timeline/intent signal): "Are you actively evaluating solutions right now, or still in research mode?" Buttons: Evaluating now / Research phase / Not sure yet
Message 4 (Routing branch): Based on answers, route to:
- Hot (team 10+, active evaluation): "Great, one of our team will reach out within the next hour. What's the best number to reach you on WhatsApp?"
- Warm (smaller team or research phase): "Thanks! We'll send over some resources and follow up in 24 hours."
- Disqualified (under 10 people, no problem fit): "Thanks for chatting! Here's a link to our guide that might help: [resource link]"
In ManyChat, set the trigger for this flow to fire when a new conversation starts from your Meta ad source. Under Automation → Keywords / Entry Points, create a Flow trigger for "New Conversation" and filter by source = Meta Ads. This prevents the flow from firing when someone messages you organically.
Step 4: Connect to your CRM
For ManyChat to HubSpot natively:
- Go to Integrations → HubSpot in ManyChat
- Connect your HubSpot account via OAuth
- In each flow message that captures a data point (company size, challenge), use ManyChat's Set Custom Field action to store the response
- Add a HubSpot: Create/Update Contact action at the end of the qualification flow
- Map ManyChat custom fields to HubSpot contact properties
For a full breakdown of which fields to create and how to structure your contact data model for chat-sourced leads, the custom fields guide for CRM setup covers the decisions most teams make incorrectly the first time. If you're using Respond.io rather than native ManyChat-to-HubSpot sync, the Respond.io to HubSpot integration guide walks through the field mapping, contact matching, and duplicate-prevention settings specific to that setup.
The minimum fields to pass on first contact:
| ManyChat Field | HubSpot Property |
|---|---|
| First Name | First Name |
| Phone | Phone Number |
| Company Size Answer | Number of Employees (custom) |
| Challenge Answer | Lead Notes (custom) |
| Timeline Answer | Lead Stage |
| Chat Source | Lead Source = WhatsApp |
| Flow Completion Date | Last Activity Date |
For Respond.io to HubSpot, use a webhook. In Respond.io's Workflow builder, add a Webhook action that posts to HubSpot's Contacts API. The HubSpot endpoint is https://api.hubapi.com/crm/v3/objects/contacts with a POST body containing the contact properties you want to create or update. HubSpot's Contacts API reference documents the full list of standard and custom property keys accepted in that payload.
Step 5: Test the full funnel before going live
Run this 5-step test sequence from a personal WhatsApp number before turning on paid traffic:
- Ad click simulation: Go to your Facebook Page, find the ad in Page Transparency, and tap the WhatsApp CTA. The pre-filled message should appear in your WhatsApp compose window.
- Conversation trigger: Send the pre-filled message. Within 30 seconds, your ManyChat or Respond.io flow should fire. Check the platform's conversation log to confirm.
- Flow completion: Answer all 4 qualification questions as a "hot" lead. Verify the routing branch fires correctly (you should receive a "team will reach out" message).
- CRM contact creation: Check your CRM. A new contact should have been created with the correct field values from your answers.
- Rep notification: If you have rep notifications configured, verify the notification fired. This is the step most teams forget to test, and it's where 40% of qualified leads disappear.
Log the timestamp at each step. If any step takes more than 60 seconds, there's a performance issue to investigate before scaling spend.
Step 6: Go-live and the first 48 hours
Turn on the campaign at a low budget. $20/day is enough to generate 5-15 conversations per day in most markets. Don't launch at full budget until you've verified the end-to-end flow with real users.
In the first 48 hours, watch these four things:
1. Conversation start rate. In Meta Ads Manager, look at Messages → Conversations Started. If your click-through rate is healthy but conversation starts are low, the pre-filled message is getting dropped. Check that the WhatsApp number connected to the campaign is your API number, not the app.
2. Flow completion rate in ManyChat. In ManyChat Analytics, check how many users started vs. completed the qualification flow. Drop-off at question 1 usually means the welcome message is too long. Drop-off at question 2 means a button option is missing or confusing.
3. CRM sync. Every morning, check that new CRM contacts have the right field values. A blank "Lead Source" field means the field mapping step is broken.
4. Undelivered messages. WhatsApp has strict spam filters. If you see high "failed to deliver" rates in ManyChat, your message templates may be flagged. Review Meta's WhatsApp Business Messaging Policy and adjust any promotional language. The WhatsApp Business Platform overview on Meta's business site also explains quality ratings and how template approval status affects delivery rates.
Common pitfalls
Template not approved before campaign launch. Your Click-to-WhatsApp campaign can go live before your message templates are approved. The ad will run, users will tap it, but your first automated message won't send because the template is still pending. Always have at least one approved template before you turn on spend.
No UTM source on WhatsApp conversations. WhatsApp conversations don't pass UTM parameters from the ad. The only way to track which campaign a conversation came from is to use ManyChat's ad source tagging or Respond.io's UTM tracking via the Click-to-WhatsApp ad entry point. If you skip this setup, all your chat leads show up in the CRM with no source attribution. This is the same attribution gap that affects teams running Meta Lead Ads directly to CRM, and the fix is similar in both cases.
Flow triggering on non-ad conversations. If your ManyChat trigger is "New Conversation" without a source filter, it will fire on every WhatsApp message you receive, including customer service inquiries and warm outreach. Filter by source = Meta Ads to avoid sending your sales qualification flow to existing customers.
CRM receiving duplicates from the same phone number. When a user messages you twice (once from an ad, once organically), ManyChat creates two flow completions. If your CRM integration uses "create contact" instead of "create or update contact," you'll get two records. Always use upsert logic with phone number as the matching key.
What to do next
Before you scale to your real campaign budget, run a 3-day test campaign at $20/day. By day 3, you should have enough conversations to check every stage: conversation start rate, flow completion rate, CRM data quality, and rep response time.
If any stage is broken, it's far cheaper to fix at $20/day than at $200/day. Most teams discover 2-3 issues in this test phase. Fix them, run another 2-day test at $50/day, then scale.
The next step is making your qualification flow sharper. That means fewer questions, better branching logic, and routing rules that get the right lead to the right rep without manual review. Once the flow is stable, set up lead routing automation so qualified conversations reach the right rep within minutes rather than sitting in a shared queue. And use the chat funnel metrics framework to track stage-by-stage performance from ad click through to deal creation.
Learn More

Co-Founder, Rework.com
On this page
- Prerequisites: What you need before you touch Ads Manager
- Step 1: Create the Click-to-WhatsApp campaign in Meta Ads Manager
- Step 2: Set up your WhatsApp Business API number
- Step 3: Build the qualification flow in ManyChat
- Step 4: Connect to your CRM
- Step 5: Test the full funnel before going live
- Step 6: Go-live and the first 48 hours
- Common pitfalls
- What to do next
- Learn More