More in
Team Onboarding Guide
How to Run Sales Shadowing That Actually Develops Reps
Apr 18, 2026
Buddy Systems That Actually Last: A Sales Onboarding Guide
Apr 18, 2026
First-Deal Coaching: How to Guide New Reps Without Doing It for Them
Apr 18, 2026
Product Knowledge Onboarding: How Much Is Enough Before a Rep Sells?
Apr 18, 2026
Onboarding Remote Hires Into an Office-Heavy Team Without Leaving Them Behind
Apr 18, 2026
When Should New Reps Start Prospecting? A Manager's Decision Framework
Apr 18, 2026
Sales Certification Programs: Which Ones Are Worth It and How to Build Your Own
Apr 18, 2026
How to Measure Time-to-Productivity in Sales Onboarding Without Fooling Yourself
Apr 18, 2026
Onboarding a Hiring Wave: How to Scale Without Dropping Quality
Apr 18, 2026
Offboarding Sales Reps: How to Capture Knowledge Before It Walks Out the Door
Apr 18, 2026
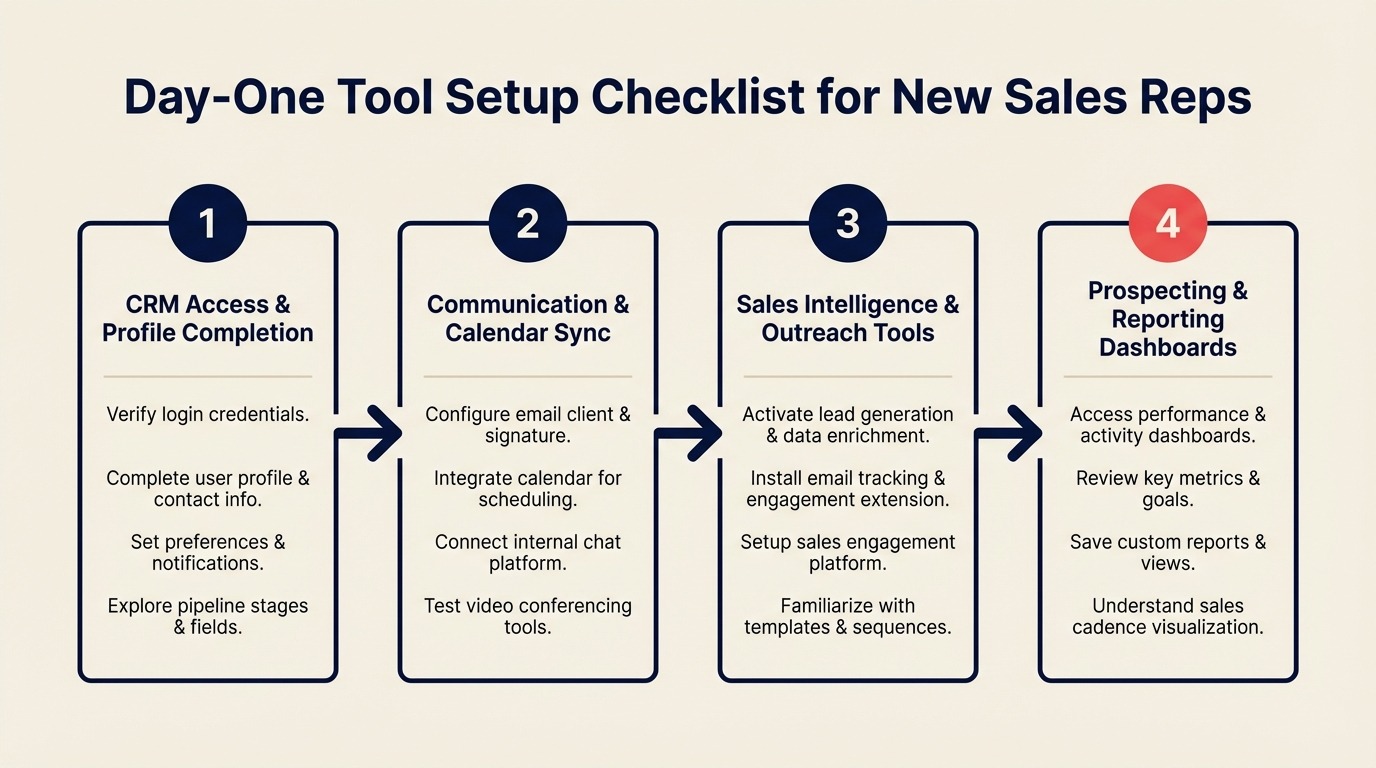
Day-One Tool Setup Checklist for New Sales Reps
Turn this article into takeaways for your work.
Each assistant summarizes the article only for you and suggests best practices for your work.
The most common new hire complaint isn't "the role wasn't what I expected." It's "I didn't have access to the tools I needed for two weeks." SHRM research on new hire retention notes that tool provisioning delays are among the top friction points cited by new sales hires in their first month, with a direct effect on whether new employees make it past 90 days.
A sales rep who can't log into the CRM on day one can't follow the onboarding plan. They can't shadow calls efficiently if they can't pull up the account record. They can't run their first sequence if their email isn't connected. Every access gap is a day of ramp time lost, and it shapes the rep's first impression of the company's operational competence. The manager's weekly onboarding checklist has a companion action for this: verify tool setup by 11 AM on day one, before the rep flags anything themselves.
One sales manager at a B2B software company fixed this with a 15-item pre-hire checklist and a structured day-one walkthrough. Her new rep completed their first CRM data entry before noon on day one. By end of week two, they'd logged 12 calls and had 3 opportunities in the pipeline. The tool setup didn't ramp them. But removing the friction made everything else possible.
This guide gives you that checklist, the day-one sequence, and a verification process the rep completes themselves before the end-of-day manager check-in.
Step 1: Pre-Hire Provisioning (Complete Before Day One)
Everything in this list should be done before the rep's first morning. If it's not done before they arrive, it's a problem you're solving on their time.
Pre-hire provisioning checklist:
- Corporate email account created (format matches team convention: first.last@company.com)
- SSO identity provider connected (Okta, Google Workspace, or Azure AD): all app access flows from this
- CRM seat provisioned with the correct role permissions (sales rep, not admin; not read-only)
- Slack workspace invite sent to personal email before day one; rep should join before arrival
- Google Calendar or Outlook access confirmed; corporate calendar shared with manager
- Sales engagement tool seat assigned: Outreach, Salesloft, or Apollo (rep-level access, not admin)
- Video conferencing set up: Zoom or Google Meet with company account (not personal)
- LinkedIn Sales Navigator seat assigned if your team uses it
- Document storage access: Google Drive folder shared or SharePoint permissions set
- Sales playbook and onboarding doc links sent to personal email before day one
One SSO note: if your company uses Okta or a similar identity provider, provisioning SSO first means all downstream app access can be granted through the identity provider rather than individually. Do this step before any other provisioning. It saves 45 minutes on day one. According to Gartner's research on IT onboarding friction, companies centralizing provisioning through an identity provider reduce new hire tool access delays by 40-50% compared to app-by-app provisioning, with the biggest gains in organizations with more than 10 software tools in the sales stack.
Step 2: The 4-Hour Day-One Setup Walkthrough
The first four hours of day one should have a defined sequence. Give the rep a printed or digital copy of this walkthrough and let them work through it with you available for questions. Don't sit next to them and narrate every step. Self-directed setup builds confidence and surfaces where they actually get stuck.
9:00 AM: Email (20 min)
- Log into corporate email via SSO
- Configure email signature (provide template)
- Send a test email to manager to confirm delivery
- Set up email forwarding or mobile access if used by your team
9:20 AM: CRM (40 min)
- Log into CRM via SSO
- Complete profile: name, title, photo, notification preferences
- Connect email to CRM (HubSpot email sync, Salesforce Einstein Activity, or Rework CRM's inbox integration)
- Set default pipeline view and stage filters
- Review 2-3 existing account records to understand data structure
10:00 AM: Calendar sync (20 min)
- Confirm calendar sync to CRM is working: create a test event and verify it appears in CRM timeline
- Set up scheduling link (Calendly, HubSpot Meetings, or equivalent)
- Share scheduling link with manager
10:20 AM: Sales engagement tool (30 min)
- Log into Outreach, Salesloft, or Apollo via SSO
- Connect email account to the tool
- Verify email sending is authorized (most tools require domain verification; confirm with Ops before day one that this is done)
- Review one existing sequence to understand structure (don't enroll prospects yet)
10:50 AM: Slack (20 min)
- Join all required channels (provide a list: #sales-team, #deals, #wins, #announcements, #general, and any product or vertical channels relevant to their role)
- DM three teammates to introduce themselves
- Find and pin the sales playbook and onboarding doc
11:10 AM: First data entry (30 min)
- Create their own contact record in the CRM (good low-stakes test of the full data entry flow)
- Log a test activity on a designated sandbox account
- Confirm the activity appears in the timeline and in the manager's view
Step 3: CRM Configuration for the New Rep
Some CRM setup belongs to the admin; some belongs to the rep. Getting this boundary right prevents two problems: the admin doing setup the rep can't reproduce, and the rep spending an hour on configuration they didn't need to touch.
Admin configures before day one:
- Role-based permission set (what they can create, edit, delete)
- Territory or account assignment (if applicable)
- Default pipeline stages visible to reps in this role
- Required field validation settings
Rep configures on day one:
- Notification preferences: which CRM events send email vs. in-app notifications (too many notifications is a common day-one overwhelm trigger)
- Email signature sync: the template they'll use for all CRM-logged emails
- Default views: which columns appear in their contact, company, and deal list views
- Personal dashboard: what metrics they want visible on their home screen
What to skip on day one:
- Workflow automations (they'll learn these in week two when they understand the process)
- Custom reports (premature until they have data to report on)
- Integration with third-party tools beyond email and calendar
Step 4: Sales Engagement Tool Setup
Whether your team uses Outreach, Salesloft, or Apollo, the day-one setup goal is the same: the rep can send one email from the tool before the day ends.
Outreach day-one setup:
- Confirm email account is connected and sending is authorized
- Find the onboarding sequence that your team has built for new rep learning (not for prospects; many teams build a "week one prospecting basics" sequence for new hires)
- Review sequence structure, subject line conventions, and send timing
- Don't enroll real prospects until the manager has reviewed their first template draft in week two
Salesloft day-one setup:
- Connect email via OAuth
- Set up calling if your team uses Salesloft Dialer
- Review one existing cadence to understand the step structure
- Locate the team's template library and read through the first-touch templates your team uses
Apollo day-one setup:
- Connect email sending domain
- Review the sequence library and the first-touch templates currently in use
- Confirm credit allocation for email find and enrichment
One template they send on day one: Not to a prospect. To themselves, using the rep-test email you'll set up in your sandbox domain. The goal is to confirm the full send flow works (email authenticated, send logged in CRM, reply tracked) before they send to a real prospect.
Step 5: Calendar and Email Sync Verification
CRM email and calendar sync fails silently more often than it should. These two verifications should be completed before the manager check-in:
Email sync verification:
- Send an email to a test contact in the CRM from the rep's email client (not from inside the CRM)
- Open that contact's record in the CRM
- Confirm the email appears in the activity timeline within 5 minutes
- Reply to the email from within the CRM and confirm it sends and logs
Calendar sync verification:
- Create a calendar event with a test contact from within the CRM
- Confirm it appears in the rep's Google Calendar or Outlook
- Accept a calendar invite from an external address and confirm it logs in CRM
If either sync isn't working, fix it before moving on. Email and calendar sync are infrastructure for everything else. A McKinsey analysis of B2B sales productivity found that reps who work in a fully integrated tech stack (CRM synced to email and calendar from day one) spend 15-20% more time on active selling activities compared to those resolving tool integration issues throughout their ramp. CRM activity logging, pipeline visibility, and call reviews all depend on them working reliably. For a deeper look at how CRM data quality affects your ability to coach and forecast, pipeline hygiene as a cultural practice is worth the read.
Step 6: The Self-Check Test
Before the end-of-day manager check-in, the rep completes five tasks on their own. These aren't tests of what they know. They're a functional verification that their setup is actually working.
5-task self-verification:
- Log a phone call on a sandbox account record in the CRM
- Send an email from within the CRM and confirm it appears in the email client's sent folder
- Create a new contact record with all required fields populated
- Book a test meeting using their scheduling link and confirm it appears in CRM
- Post a message in the #sales-team Slack channel introducing themselves
If they get stuck on any of these, that's the signal for the end-of-day check-in. You'll know exactly what to fix.
Step 7: The 4 PM Manager Check-In
Ten minutes at the end of day one. Three questions:
- Which of the five verification tasks did you get stuck on? Address anything that's broken before they leave. Access issues that aren't resolved by end of day one tend to persist for days.
- What's one thing that surprised you about the setup process today? This surfaces friction you didn't know existed. You'll improve the checklist for the next hire.
- Is there anything you need to have set up before tomorrow morning? Some reps will have needs specific to their previous CRM or tool preferences. Better to know now.
What to address immediately vs. queue for week two:
Address now: any sync that isn't working, any tool the rep can't log into, any access that's wrong (read-only when they need write access).
Queue for week two: custom views, sequence templates, advanced features, integration setup. These are week-two items when the rep has enough context to configure them meaningfully.
Common Pitfalls
Provisioning access without configuring defaults. A rep with CRM access but no pipeline view configured or no email sync set up is barely better off than a rep with no access. The defaults matter.
Forgetting that SSO means one failure cascades. If SSO isn't working, nothing works. Provision SSO first, verify it, then provision everything else.
Giving access to every tool on day one. If a rep has 12 tools to set up on day one, they'll configure half of them incorrectly and spend the rest of the week trying to remember which settings go where. Sequence the tool setup across the first two weeks. Lead with the ones they need to do anything at all (email, CRM, Slack) and defer the rest.
No verification step, so problems hide until week two. The five-task self-check exists for exactly this reason. Don't skip it.
What to Do Next
Turn this checklist into a repeatable task template in your project management tool before your next hire starts. Monday.com, ClickUp, Asana, and Notion all support checklist templates you can assign to the hiring manager or People Ops with due dates set relative to the hire start date. If you're also thinking through which CRM to provision in the first place, the CRM buyer's checklist is a practical starting point. Pre-hire items get due dates 3 business days before start; day-one items get the start date itself. You'll only need to build it once.
Learn More

Co-Founder, Rework.com
On this page
- Step 1: Pre-Hire Provisioning (Complete Before Day One)
- Step 2: The 4-Hour Day-One Setup Walkthrough
- Step 3: CRM Configuration for the New Rep
- Step 4: Sales Engagement Tool Setup
- Step 5: Calendar and Email Sync Verification
- Step 6: The Self-Check Test
- Step 7: The 4 PM Manager Check-In
- Common Pitfalls
- What to Do Next
- Learn More